Volvo
Special Tool Designs
FAQ
Home

Volvo
Maintenance FAQ for 7xx/9xx/90 Cars
Version 5.0
Homemade Tools from Brick Owners
Homemade
Cooling System Pressure Tester. Here's what I've rigged up for both
pressure testing the cooling system and bleeding the clutch and brakes:
I found an old bottle cap that has the same threads as the coolant reservoir.
Then I bought $1.00 worth of tank valves and screwed one into it. If you
don't have such a cap, then an old coolant reservoir cap should work even
better. When I need to use it, I take the gasket out of the coolant reservoir
cap and use it in my "pressure cap". I connect a $5.00 bicycle pump (with
built in pressure gauge) to the cap and presto. Since the brake reservoir
has the same type orifice, it can also be used to pressure bleed the clutch
and brakes.
Fuel
Pressure Test Tool. At last check, Volvo wanted $600 for the pressure
rig to test control,
system, and residual pressures. I built
one for much less ... here's how. Parts needed:
2 Banjo 'nut' fittings (the ones that
actually look like a banjo). Hack apart old fuel lines from an Audi, VW,
or BMW from the wreckers to get the ones with the small nipples. Make sure
they're the same diameter as your Volvo (see the tip below for Volvo
parts needed.)
1 Brass Tee , 3/8" NPT
1 Brass Valve, 3/8" NPT=20
1 150 psi gauge
2 2.5" 3/8" NPT brass extender (pipe w/
both ends threaded)
2 3/8" NPT brass nipples
2" vacuum hose
4 small tie wraps (zip ties)
1 nylon spacer, 2" long, that will accept
the 'bored' banjo bolts
some telfon tape for sealing
Now, hook them up in this order:
Banjo Nut - 1" vacuum hose - nipple - extender
-tee -valve -extender-nipple-1" vacuum hose - Banjo Nut
Use the tie wraps to clamp the vacuum hose
onto the banjo nuts and the nipples. Vacuum host isn't ideal for this,
but the tests are short term and a short piece of the hose holds the pressure
just fine. The gauge goes on the top of the tee. Be sure to use teflon
tape to seal all connections.
One of the banjo bolt goes where your control
pressure feed line connects to the fuel distributor. The other one gets
bolted into one end of the nylon spacer. The other end of the spacer has
the control pressure feed line bolted to it.
Now, follow your Bentley or Haynes directions
to test... when placing the tester into the fuel circuit, be sure to orient
the valve on the correct 'side' or else you'll only be able to measure
system pressure.
Special Volvo Fittings to Make Connection.
[Tip
from Neal] Here are the Volvo part numbers for two hard to get parts needed
to build a fuel pressure gauge assembly:
9995267-7 Nipple $27.45
9995116-2 Hose $ 9.30
The nipple is the fitting that connects
between the rubber fuel line and the fuel rail. The hose includes the banjo
fitting that attaches inline with the nipple. The other end of the hose
is an unusual fitting that I imagine could connect only to a Volvo fuel
pressure gauge. I cut that fitting off, and installed a 1/8" male pipe
thread with barbed fitting pressed onto the hose. The 1/8" male pipe screws
into almost any fuel pressure gauge found at any auto store. Make sure
you get a gauge that goes to at least 100psi.
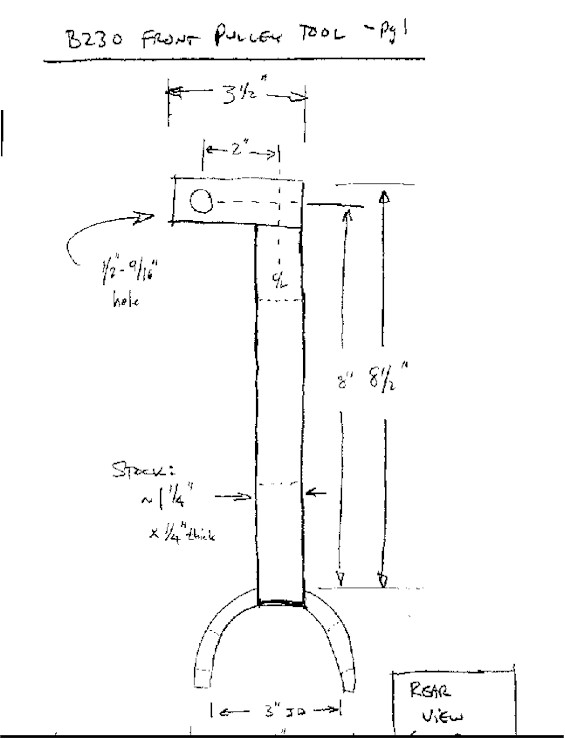
B230F
Crank Holder Tool. [Don Foster] Here is the design for
the tool used to secure the crank pulley to remove the bolt while changing
the timing belt. [Editor's Note: You can purchase this tool number
5284 from Volvo dealers; see the FAQ section on Timing
Belt Tips]
Rear View:
Side View:
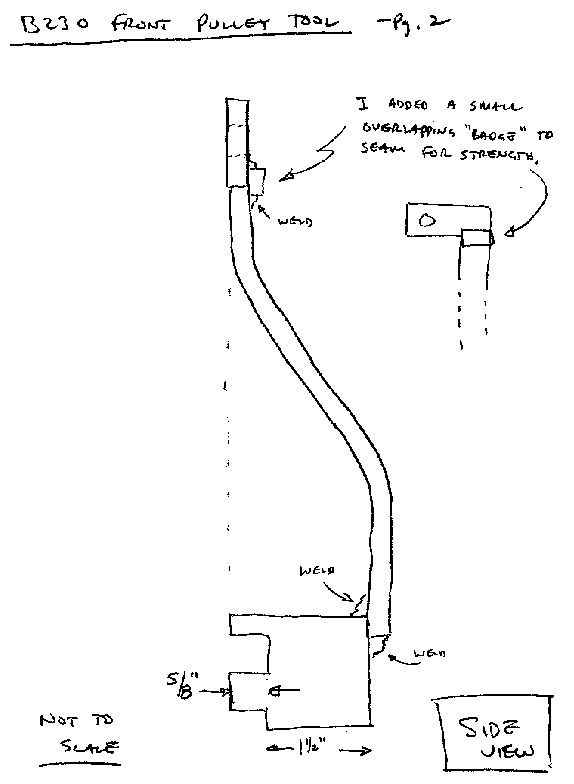
Detail of Rear and Front Views:

Vacuum
Leak Checker. [Tip from Paul Kane] A good vacuum leak check device
is a butane charcoal lighter. Don't light it, just use it for
'sniffing' around the suspected leak. Apply the butane to the potential
leak- if RPMs change - you've found the leak.
Large
Gauge Wire Crimper. [Tip from Tom Harper] Ever needed to
get a solidly crimped electrical terminal on larger cables (8 - 4 gauge),
but found the cost of crimp tools in that size to cause "sticker shock"?
Here's something I've been doing - it works for UNinsulated terminals.
1. Measure the OD of the uninsulated terminal
barrel you need to crimp
2. Find (or buy - a dime or so) a nut
with a thread size (thread OD - not ID) equal to or slightly smaller than
the size in step 1
3. Drill out the nut to match the terminal
OD
4. Cut the nut in half, across opposing
corners (NOT across the flats). Your Dremel tool will come in handy for
this - a hacksaw will do it also, just takes more time.
5. Find a piece of round stock about 1/8"
- 3/16" (3-4 mm) diameter, about 3/8" (1 cm) long (you can cut the head
off a screw for this - the threads won't affect anything.)
You now have a "saddle" and a "punch" (halved nut & screw/round stock
piece).
6. Put the terminal in the "saddle", and
the "punch" lying lengthwise on top of the terminal, opposite the "saddle"
- you'll probably want to tape the assembly together, otherwise it takes
3 or 4 hands.
7. Put the cable end into the terminal,
and crimp the whole works together using a bench vise, Vise-Grips, or equivalent.
The "saddle" supports the bottom of the terminal, while the "punch" crimps
everything nice & tight.
I've gotten really tight & secure crimps
on up to 4 gauge cable by hand with this method. After a dozen or so uses,
the nut may crack & start to spread; no problem, since you have the
other half, and making new "saddles" is easy & cheap anyway.
Make sure your terminal barrel ID is close
to the wire OD - this method doesn't do too well if there's a lot of empty
space between the wire and the terminal. You may be a bit clumsy at first,
but once you work out a way to keep everything aligned as you start the
crimp, it'll go really well. The new Vice-Grip adjustable wrench
is ideal for this - the "V"-shaped jaw is ideal for supporting the "saddle".
Volvo content - used this trick yesterday
when making some "overkill" (4 gauge) engine-to-body ground and alternator-to-starter
terminal cables.
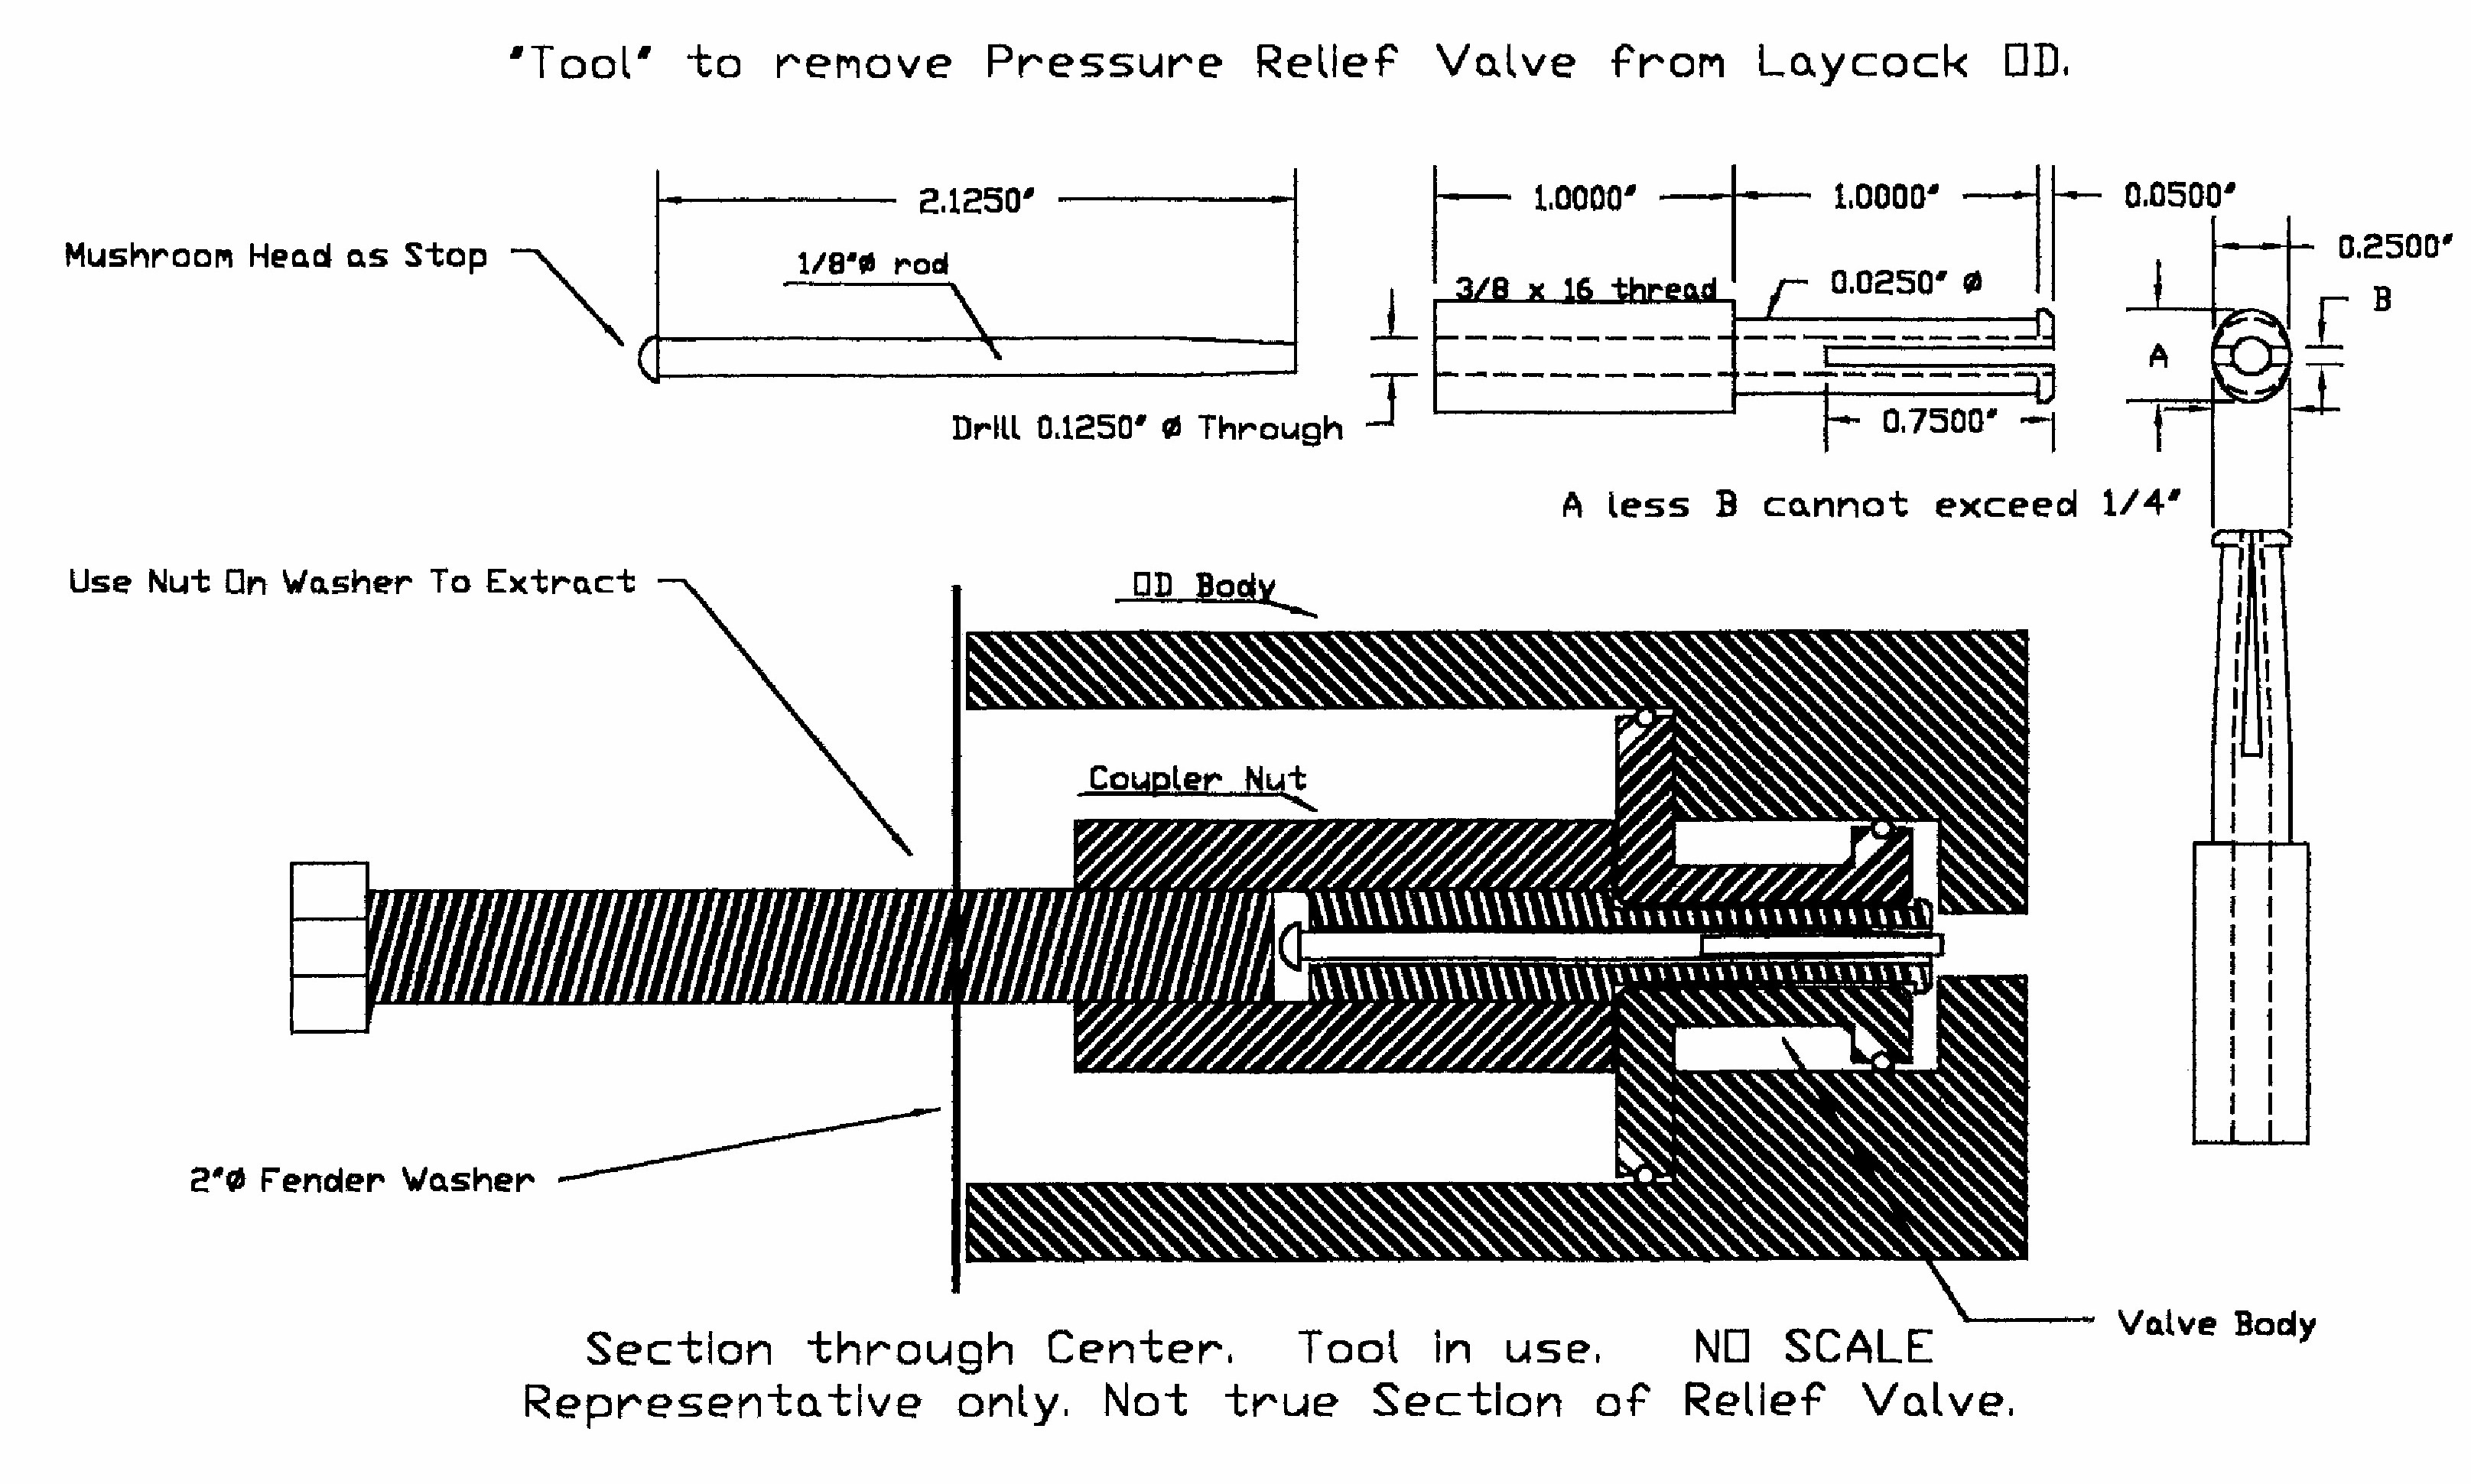
M-46
Overdrive Pressure Relief Valve Tool. [Duane Hoberg] Here
is a tool I designed for removing the Pressure Relief Valve ( between numbers
22 and 23 on the diagram
of the overdrive
overhaul procedures.
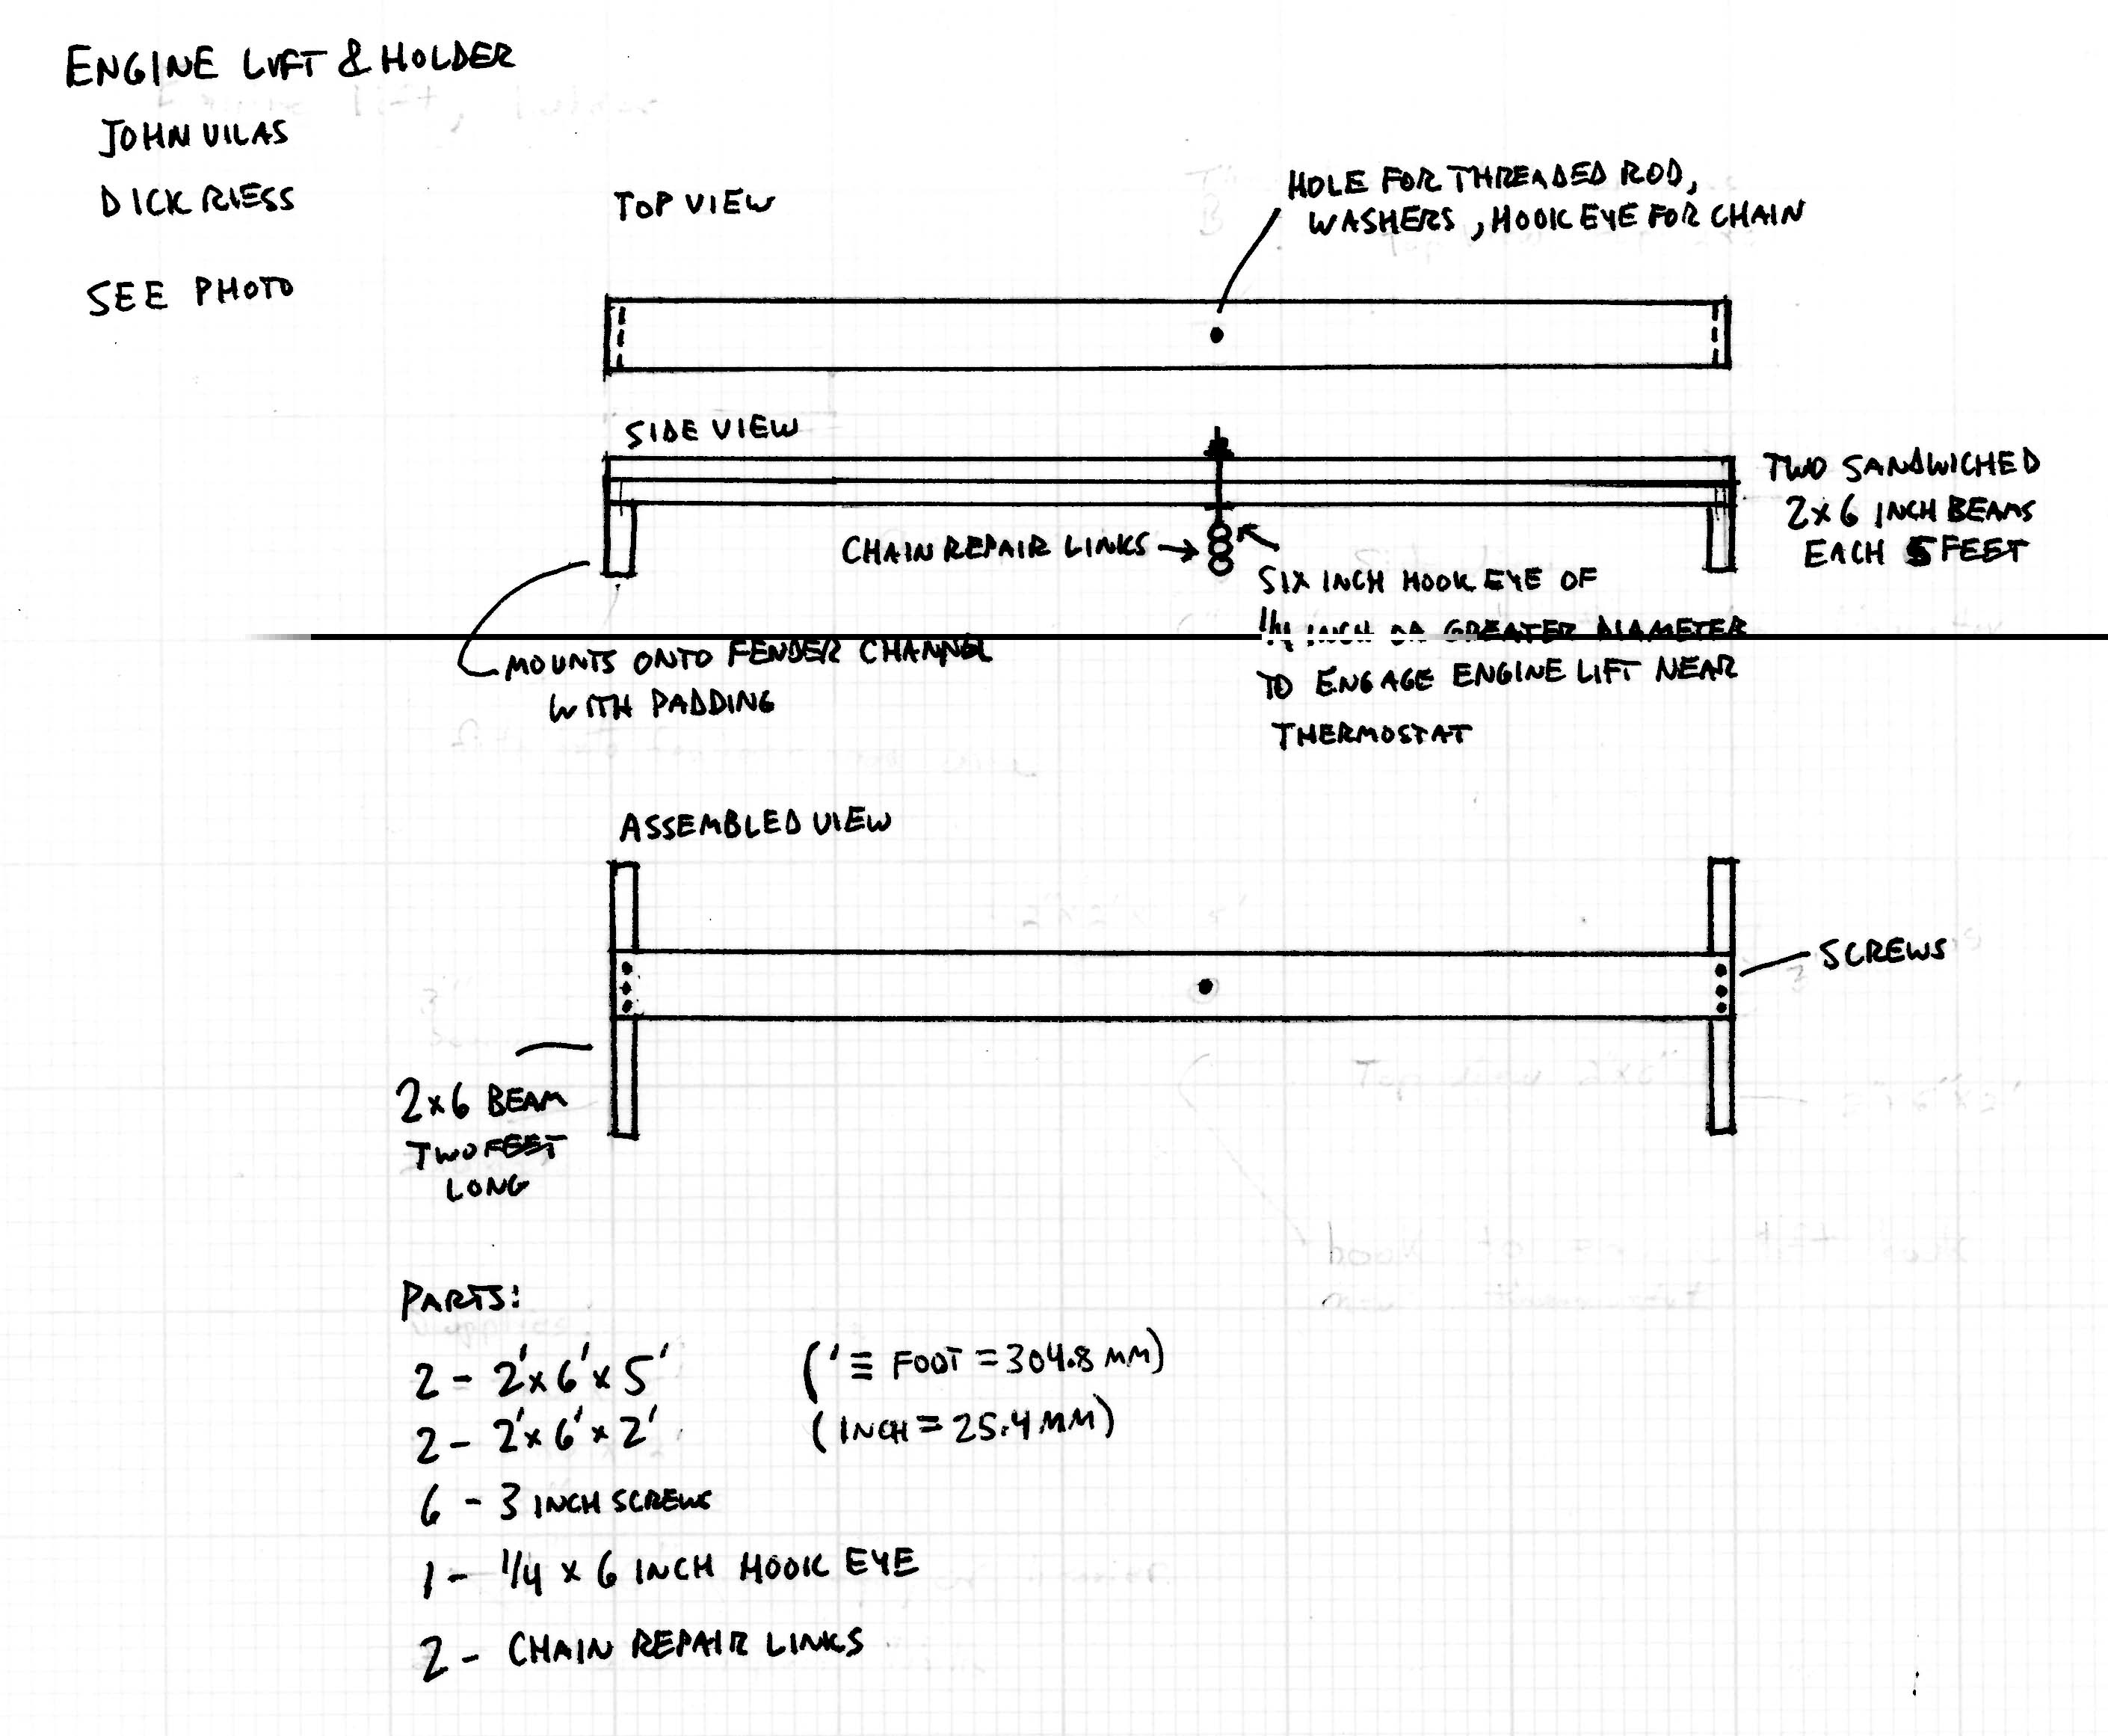
Engine
Lift and Support. See the photo and planform for Dick Riess'
and John Vilas' design for an engine lift and support, useful for changing
motor mounts and oil pans. It is made of 2x6 lumber and mounts on
the fender channels. 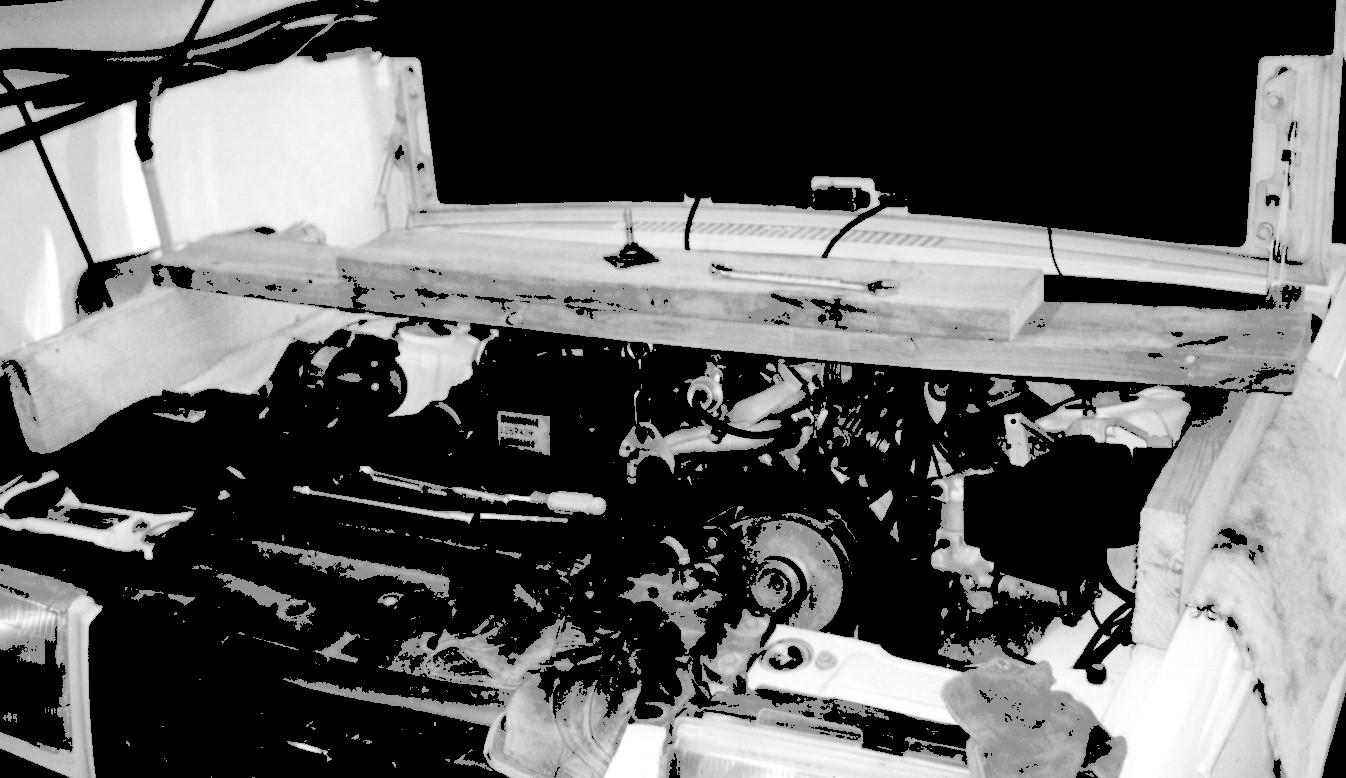
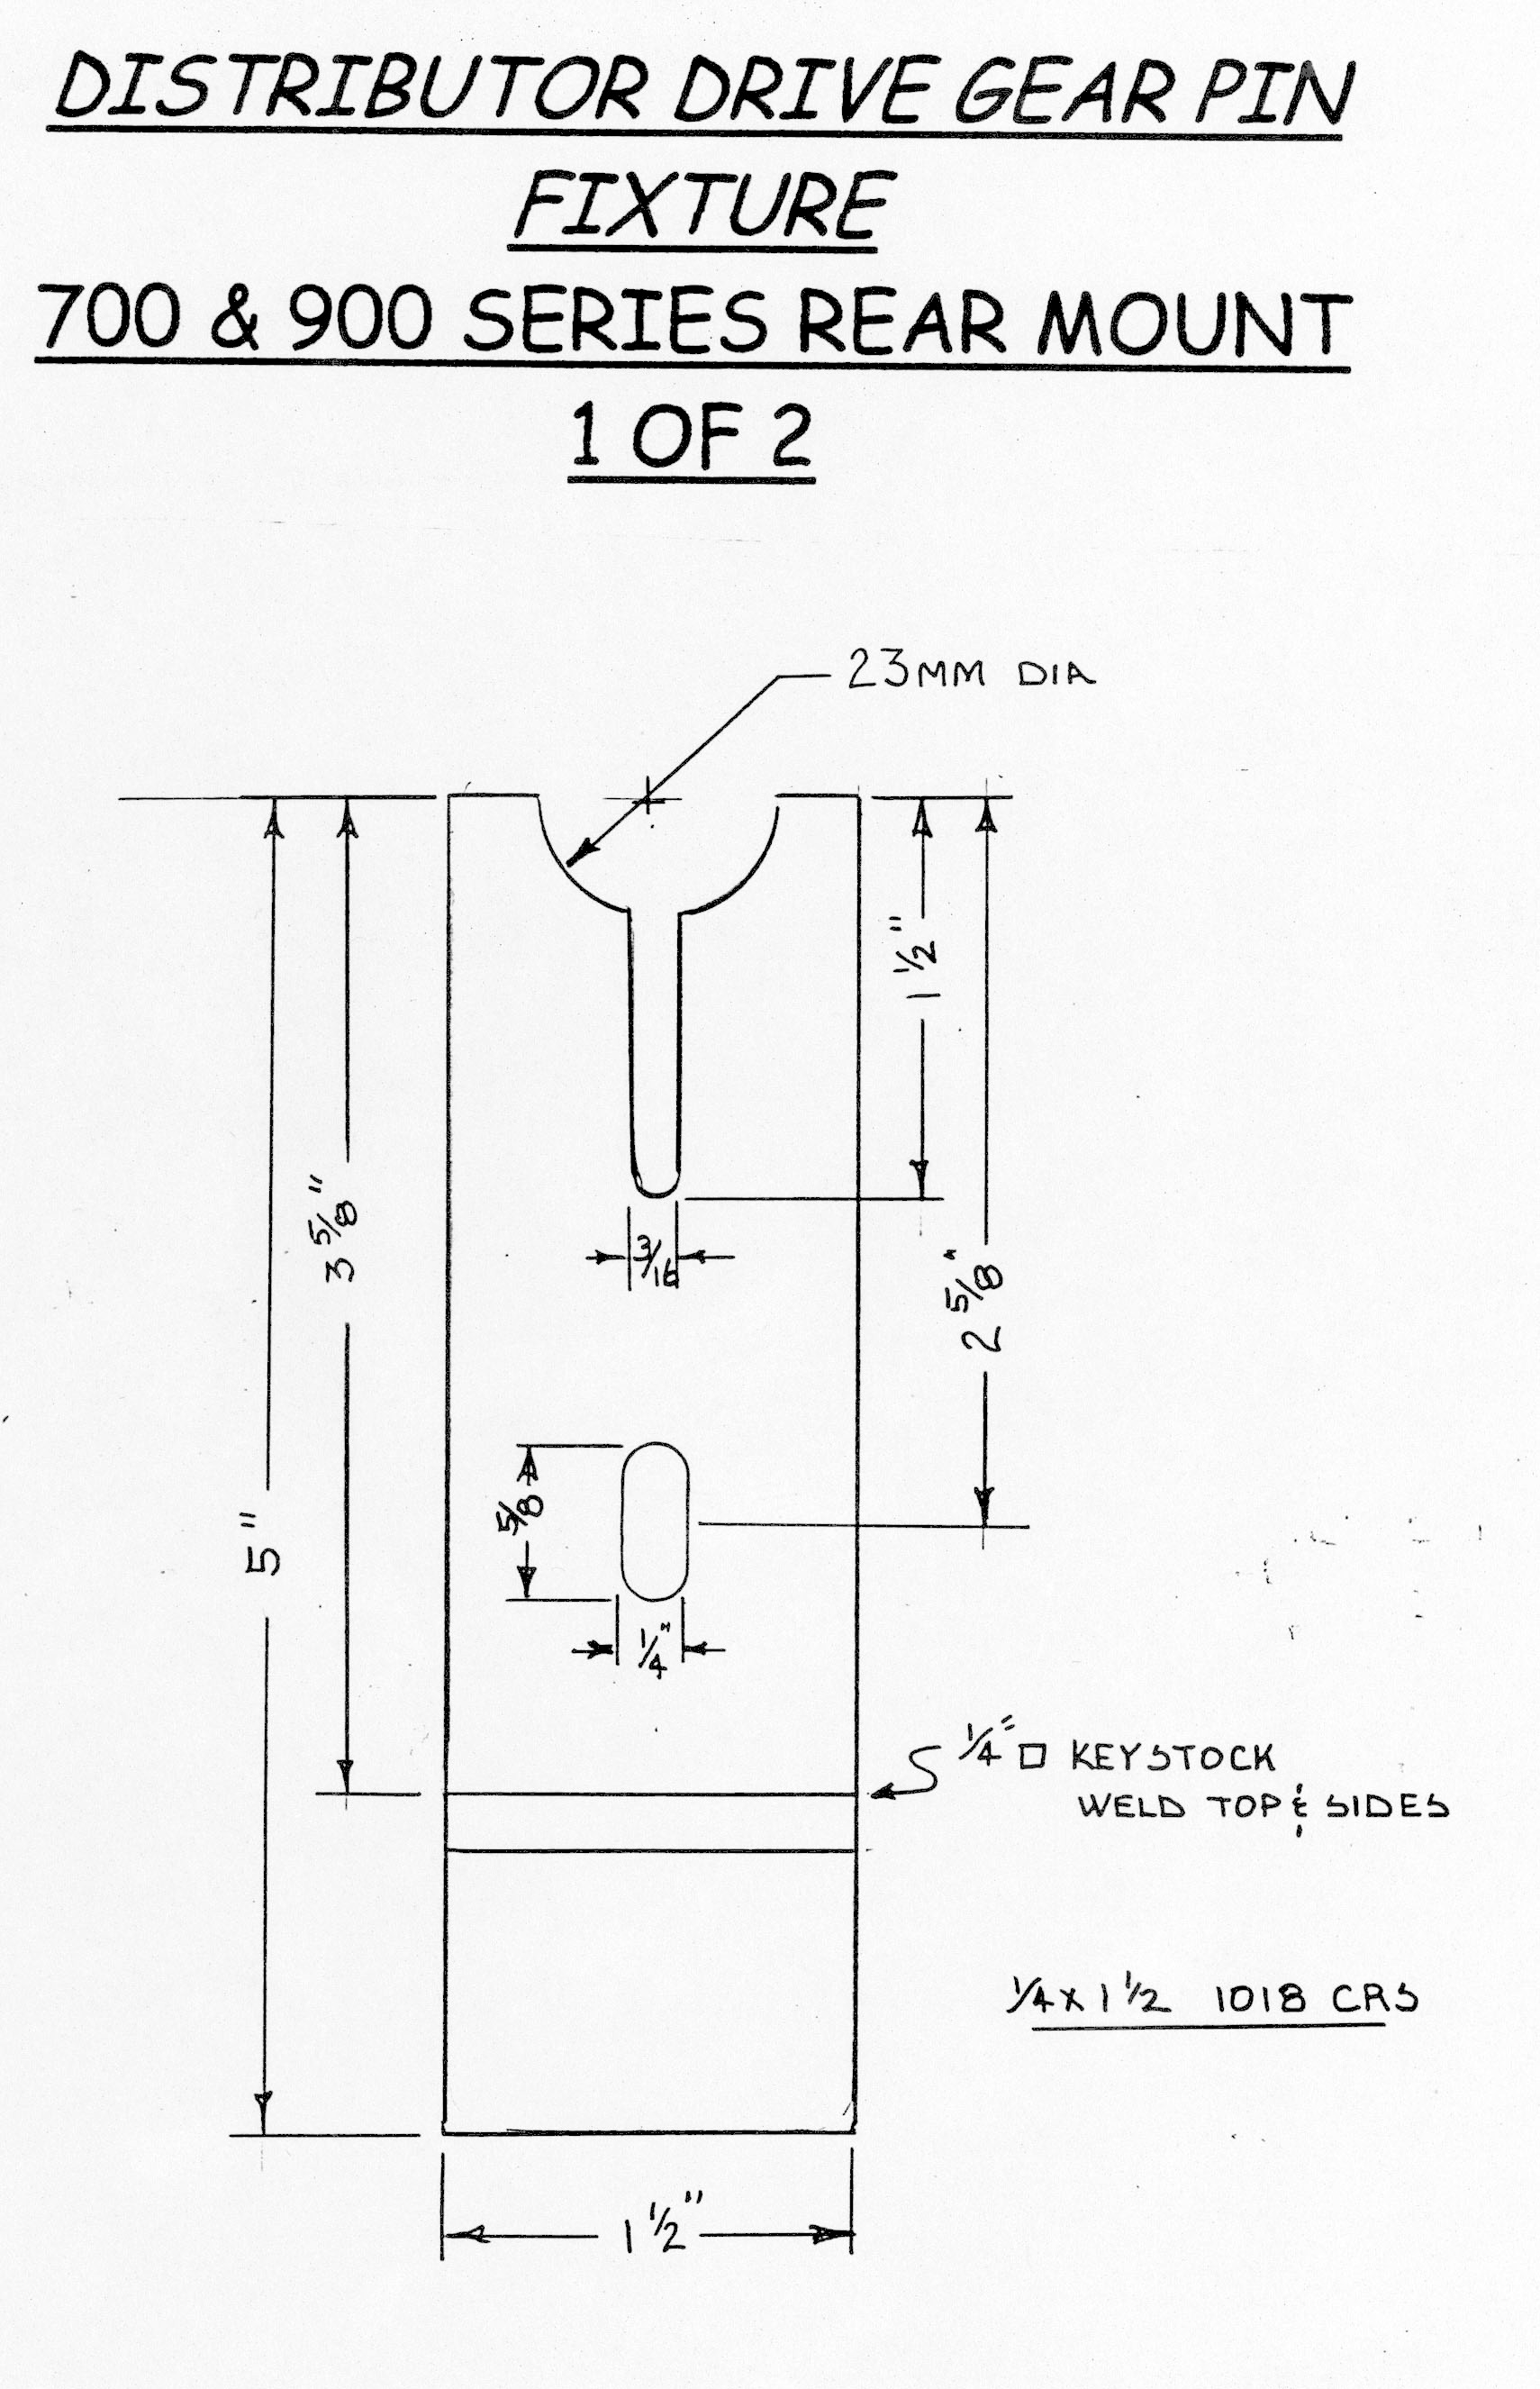
Distributor
Drive Pin Remover Tool. [Tool design by John Vilas] This
tool may be used with a vise or hammer to remove the shaft pin holding
the distributor together. You will need it should you ever decide
to change the inner o-ring seal on this shaft. You can purchase this
from:
John Vilas
Vilas Motor Works
901 S. Texas Avenue
Bryan, TX 77803-4554
Cost is $25 (at 6/6/00)

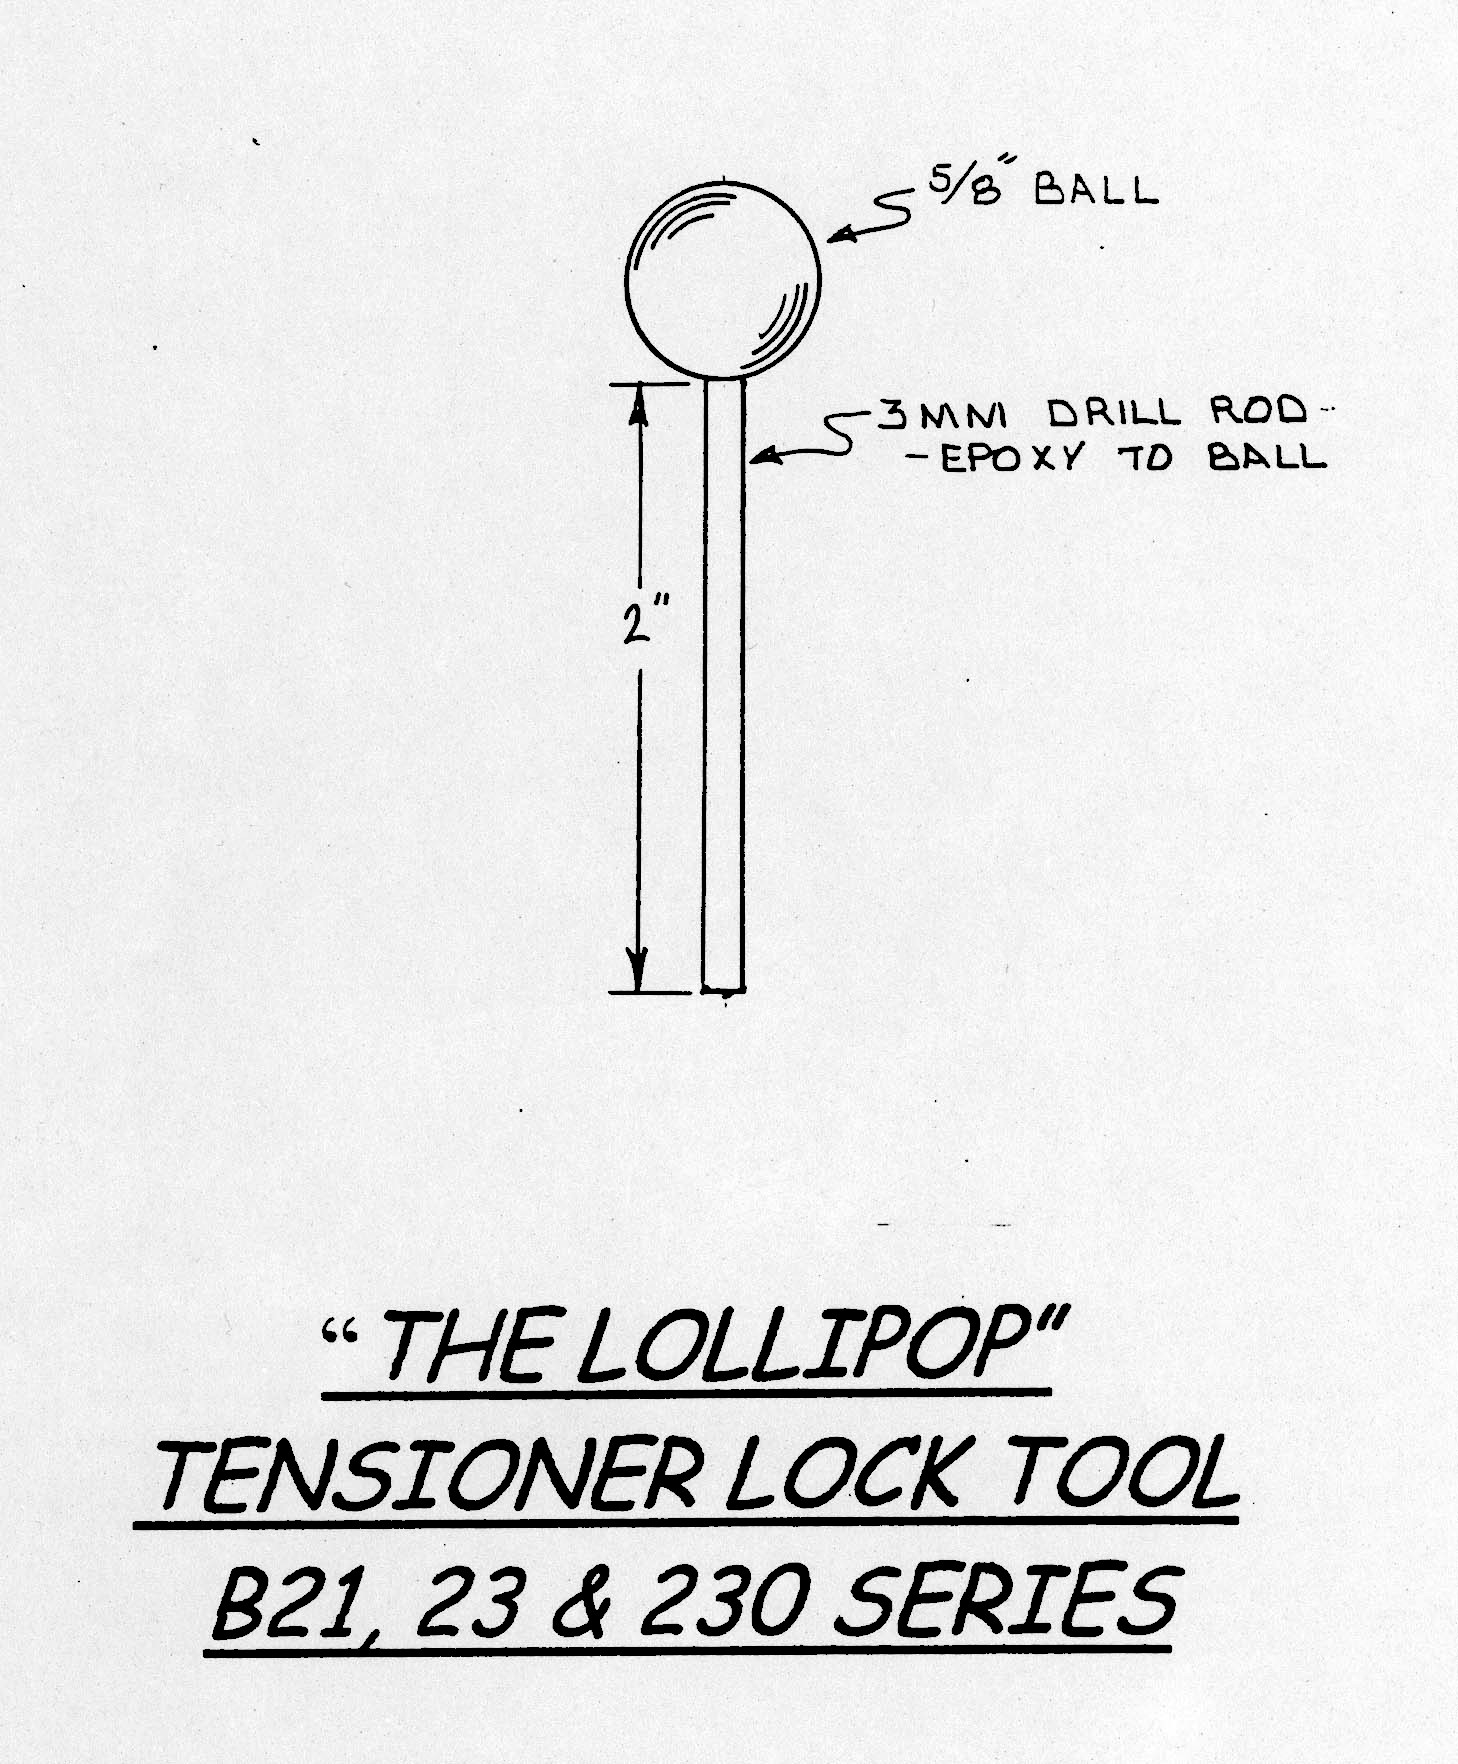
Timing
Belt Tensioner Lock Tool. Use this to secure your tensioner pulley
out of the way when installing a timing belt in B21/23/230 engines.
Purchase it from:
John Vilas
Vilas Motor Works
901 S. Texas Avenue
Bryan, TX 77803-4554
Cost is $12.50 (at 6/6/00)
Rear
Engine Seal Installer Press. Use this press to correctly install
your engine rear main seal on B21/23/230 series engines. Purchase
it from:
John Vilas
Vilas Motor Works
901 S. Texas Avenue
Bryan, TX 77803-4554
Cost is $35.00 (at 6/6/00)

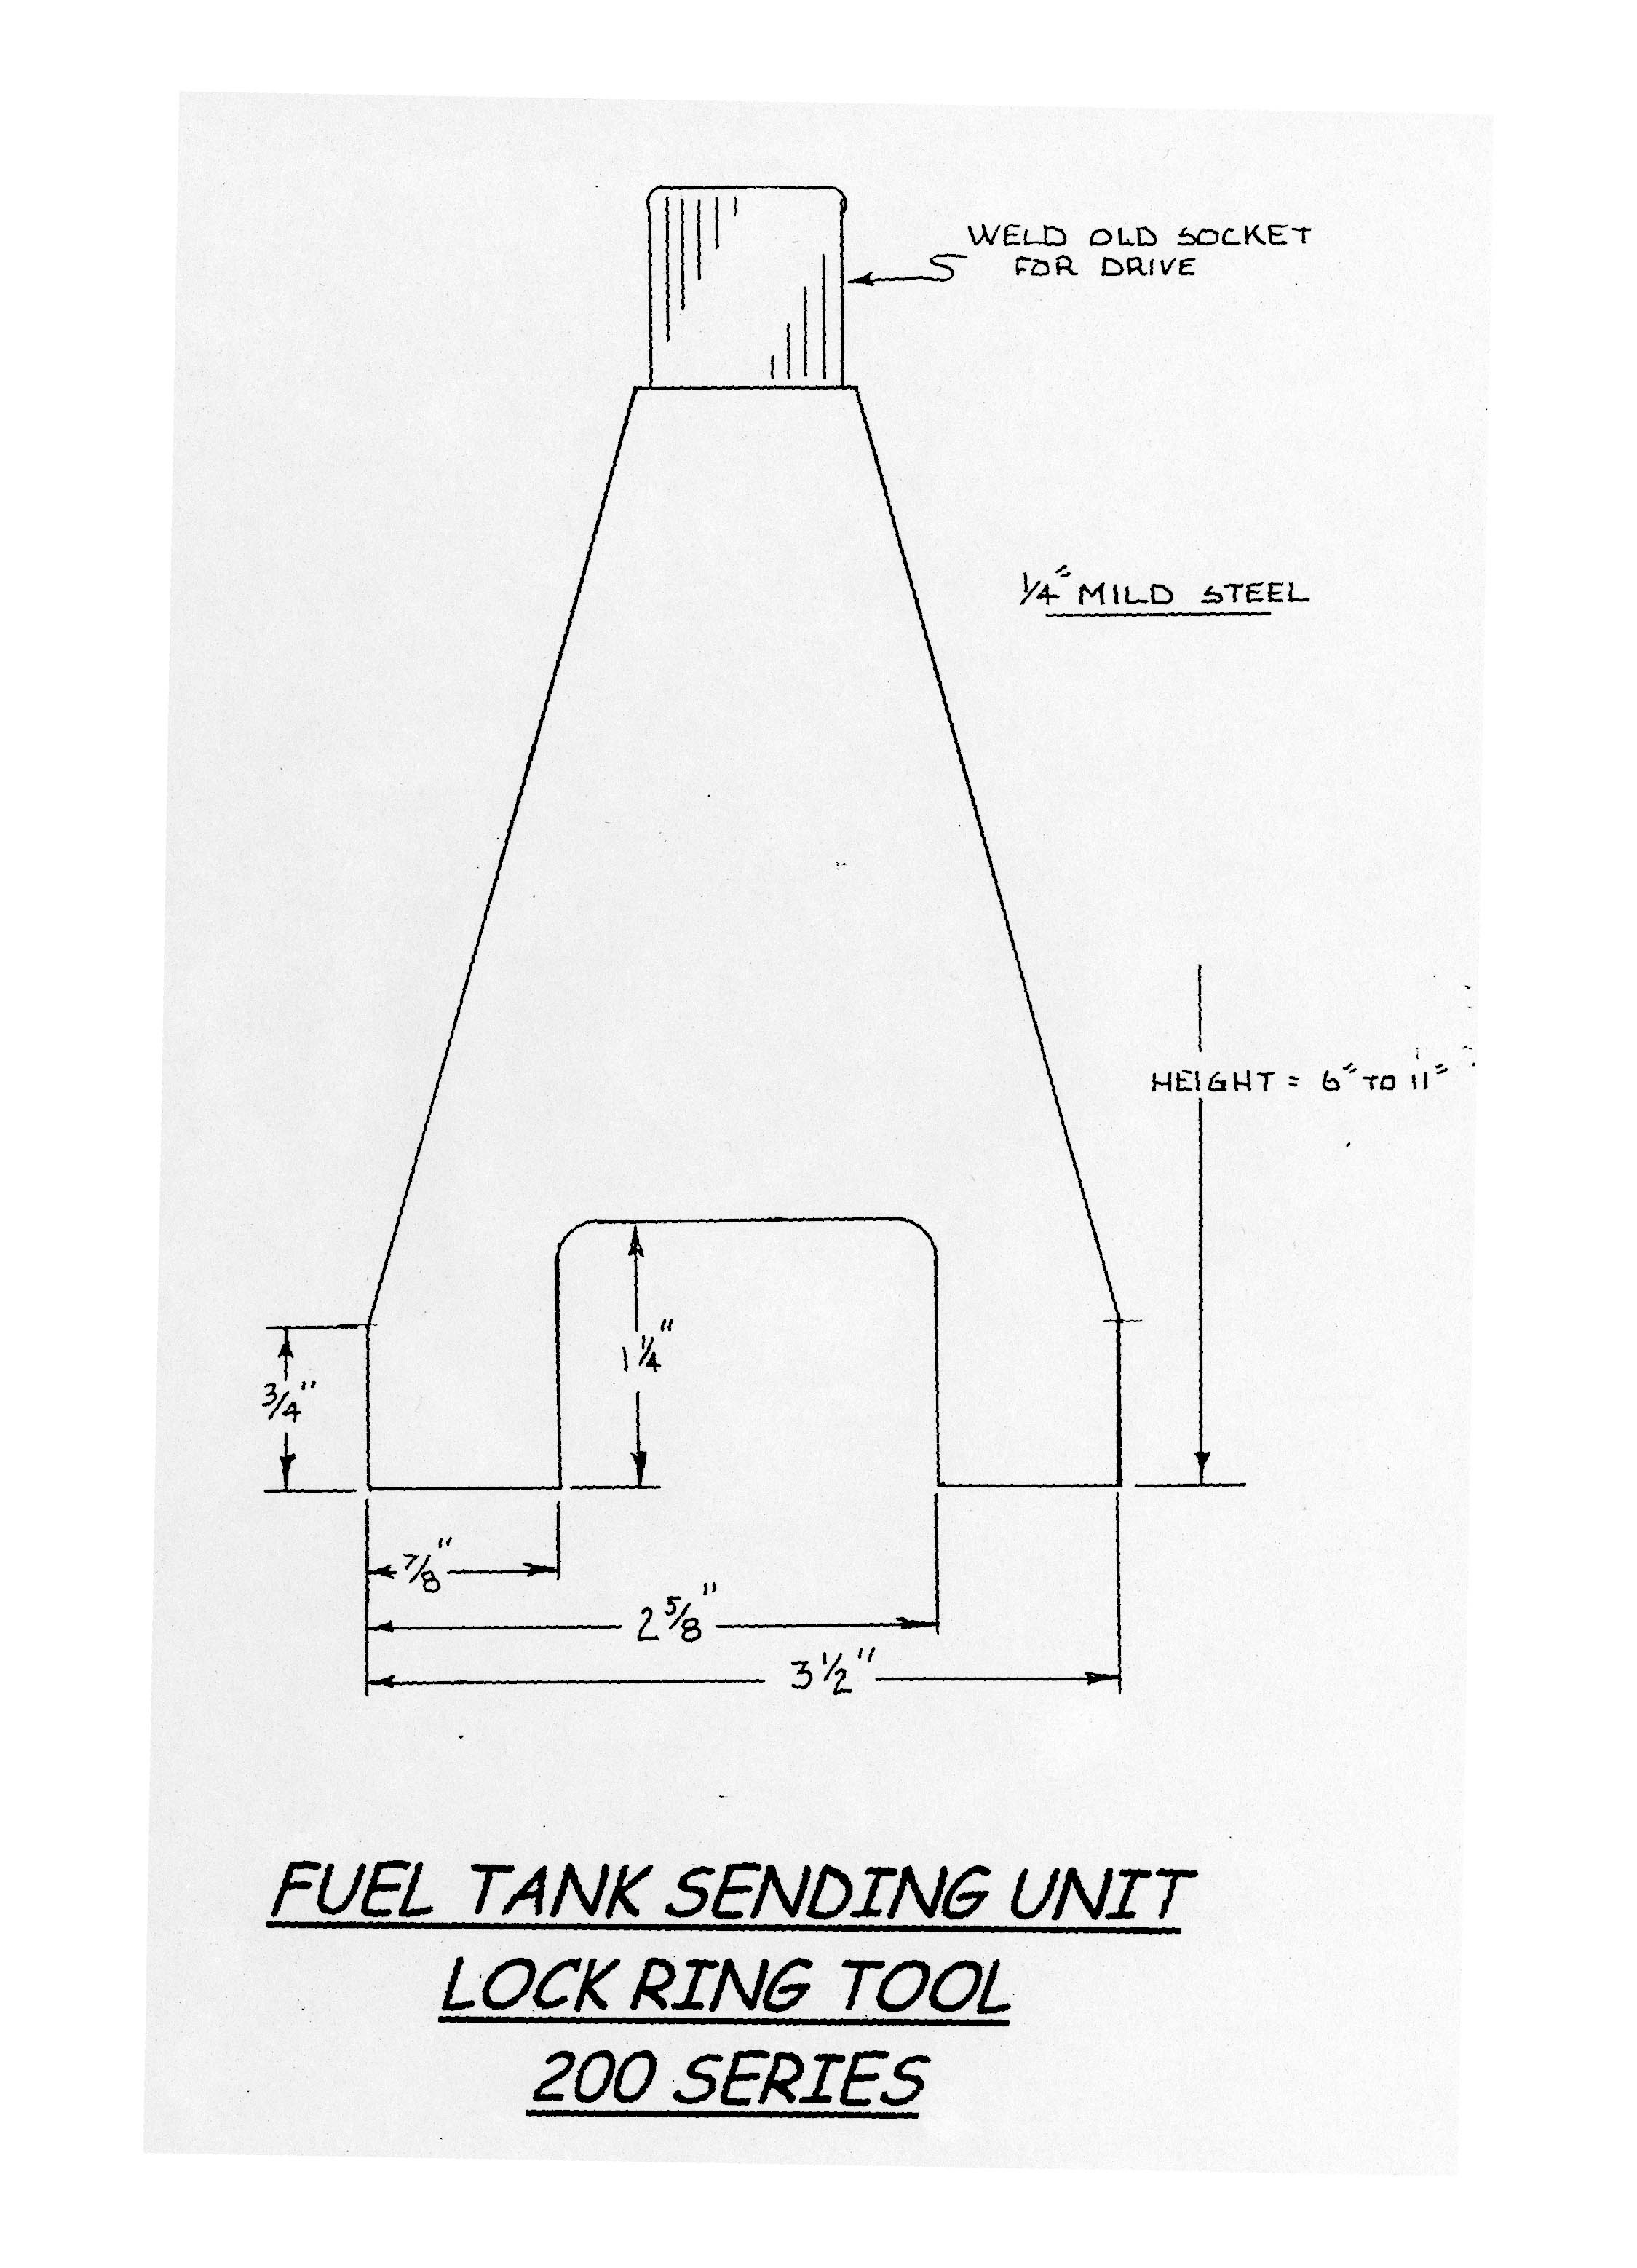
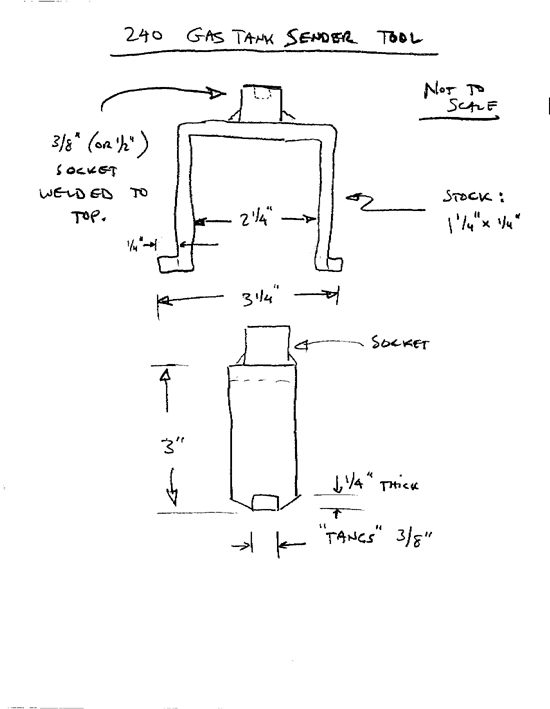
Pre-Pump
and Fuel Tank Sending Unit Removal Tools. [Special bonus for
200-series owners!] Use this lcok ring remover to take out your sending
unit on 200-series cars. Purchase it from:
John Vilas
Vilas Motor Works
901 S. Texas Avenue
Bryan, TX 77803-4554
Cost is $25.00 (at 6/6/00)
Pre-Pump Removal Tool. [Tip
from Ross Gunn] Anyone have a Prepump tool they used when they removed
the pump from the tank? Volvo has one of these tools, anyone have
one they wouldn't mind loaning out? I'm afraid of taking screwdrivers to
it as I might break something. Any ideas?
I made one out of 1/8"steel plate which
I shaped like this:
__________^____________
|
|
| _______________ |
|__|
|__|
Using vice grips as a handle at ^ , it
was quite easy to remove the level sender/pump unit.
Another version for 240 cars by Don Foster:
Volvo
Maintenance FAQ for 7xx/9xx/90 Cars
Top of Page