Electrical:
Ignition System
FAQ Home
 Volvo
Maintenance FAQ for 7xx/9xx/90 Cars
Version 5.0
Volvo
Maintenance FAQ for 7xx/9xx/90 Cars
Version 5.0
Basic
Operation and Troubleshooting of the EZ 117K [Don Willson]
This discussion is based on my 3 cars all
of which have the EZ-117K Jetronic Ignition which is for the 4 cylinder
engine, with distributor on the rear of the cam shaft, the timing signal
is from the Hall effect sensor within the distributor or an RPM sensor
on the flywheel, air is measured by an air mass meter, it has a knock sensor,
and throttle position switch.
I have had three 740s and though I am not
a professional mechanic Im a pretty good DIYer. I seldom use a dealer
or independent shop unless time or tools require it. I am an engineer
and like to know whats wrong and how that affects the engine My
basic reference are the Volvo shop manuals, especially the electrical,
engine and ignition manuals.
Wiring Diagrams
TP 31058 (1987 740), TP 31390/1 (1989 760)
Engine
TP 31451/1 (700 1985 and forward)
Ignition systems
TP 31397/1
Maintenance service
TP 31324
Specifications
TP 30518/10 (700 1982-1991)
[Editor's Note: see the section
on Maintenance Manuals
for more details on how to obtain the correct versions for your car.]
I will try to show a systematic approach
to based on a chronological order where applicable.
Starting: Turn key to run
Power is supplied to the IGNITION CONTROL
UNIT , hot side of the COIL, POWER STAGE, and most accessories.
Turn key to start
Power is removed from most accessories
and applied to the STARTER SOLENOID. (if the car is equipped with automatic
transmission it must be in Neutral or Park)
The starter pinion gear meshes with the
ring gear, the high ampere connection made and the starter motor operates.
Engine turns over. The sequence of
events is as follows.
IGNITION CONTROL UNIT (ignition computer)
sends power to the DISTRIBUTOR.
The HALL EFFECT sensor in the DISTRIBUTOR
sends a square wave electrical signal that varies from 5 to 0 volts back
to the IGNITION CONTROL UNIT. As the signal rises from 0 to 5V the
control unit starts to compute the timing of the next ignition pulse.
As the signal falls to 0V the control unit commences ignition countdown
and delivers ignition pulse as computed. [Editor's Note: this is true for
pre-88 cars; newer Volvos use an RPM SENSOR at the flywheel for the same
effect.]
When the IGNITION CONTROL UNIT gets this
signal it says the engine is turning over, lets give it some fuel and
spark (I presume this is a safety function so that in case of an accident
the fuel will not be delivered to a dead or damaged engine.). It sends
the appropriate signal to the:
POWER STAGE (ignition amplifier).
This feeds the coil which then send high voltage to the center tap of the
distributor where the distributor sends the high voltage on to the correct
spark plug.
FUEL CONTROL UNIT (LH-Jetronic.)
This unit collects signals from the AIR MASS METER (AMU), COOLANT TEMPERATURE
SENSOR, THROTTLE SWITCH, OXYGEN SENSOR (Lambda sond), and:
grounds the FUEL RELAY which (hopefully)
turns on both the IN-TANK FUEL PUMP and the HIGH PRESSURE FUEL PUMP.
Fuel then flows under pressure, in the
30 to 40 PSI range (though the pump is capable of pressures up to 80 PSI),
into the fuel rail. At the front end of the fuel rail is a PRESSURE
REGULATOR that maintains a pressure in the 30 PSI range though it varies
according to engine vacuum. A higher vacuum, as when idling or running
lightly, allows more fuel to flow back to the tank and the pressure is
reduced in the fuel rail. When under higher pressure or even turbo
boost the pressure in the fuel rail is higher and more fuel is delivered
for the same amount of injector open time.
Opens the INJECTORS for the appropriate
time. Note, since this is not a sequential fuel injection system,
all INJECTORS fire at once and timing is not an issue other than that they
fire each half resolution, so that fuel is in the intake manifold ready
for any intake valve to open.
Now the engine starts, however, there
is more to it.
If the engine is cold, like the first
start in the morning, the AIR CONTROL VALVE opens and acts like a fast
idle cam on old non fuel injected cars. The controlling signal on
this is the COOLANT TEMPERATURE SENSOR. Generally only a few seconds
is needed for this to be open, however, under some conditions it closes,
the idle speed drops significantly and it opens again.
There is no choke but since the choke
only forces a rich mixture the FUEL CONTROL UNIT will open the injectors
more times and/or for longer periods.
As the engine warms up various signals are
supplied to the FUEL CONTROL COMPUTER to modify the INJECTOR open time.
For example:
The COOLANT TEMPERATURE SENSOR sends
a signal to the FUEL CONTROL COMPUTER that less enrichment is needed (like
a choke backing off)
The AIR MASS METER supplies the engine
load as it measures the amount of air being delivered to the engine,
as a function of the THROTTLE position, and sends this signal to the FUEL
CONTROL COMPUTER for use in determining the optimum mixture
The OXYGEN SENSOR warms up and begins
to send a signal to the FUEL CONTROL COMPUTER that in real time varies
the mixture to maintain a mixture that delivers power with minimum emissions.
The KNOCK SENSOR listens for the characteristic
sound of a knock and sends a notice to the IGNITION CONTROL UNIT which
retards the spark in steps of 2.8° up to 10° to 16°, until
knocking ceases. Then it advances the spark in steps of 0.37°
until, if possible, it return to the normal advance.
After fully warmed up and running the COOLANT
TEMPERATURE SENSOR is continuously monitored and if it indicates
an overheat condition it advances the timing by 13° if the throttle
is closed on the B230FT engines.
The THROTTLE SWITCH senses when the THROTTLE
is closed, foot off of the gas, on of two things happen:
If the engine is turning over rapidly,
above idle speed, the spark and fuel are adjusted to give the maximum engine
braking.
When the engine drops to near idle speed
the spark is retarded so as to provided a smoother idle.
After Shutting Down
One item occurs after the key is turned
off, that is that a voltage is sent to the AIR MASS METER to burn off contaminants
that have accumulated.
[Courtesy of Don Willson]
Spark
Plug Notes. See Removing
Spark Plugs, Re-Threading
Spark Plug Holes, and Installing
Spark Plugs for more information.
Spark Tester.
[tip from Don Foster:] To test whether your plugs are receiving a
spark impulse, try this. It's dumb simple and works flawlessly.
How to build:
Go to your electronic junkbox, or the
local electronics workshop, or to Radio Shack. Get:
A neon bulb, NE-2
About 15' of light-gauge stranded wire (insulated, of course)
An alligator clip
A collection of heat shrink tubing
Connect a 3-4' piece of wire to one lead
of the neon bulb. Insulate the solder connection
with heat shrink. Attach the alligator
clip to the other end of the wire. This is your GROUND WIRE.
Connect a 10-12' piece of wire to the other lead of the neon bulb. Insulate
the connection with shrink tubing. This is your ANTENNA WIRE. I like to
put a larger (diameter) piece of shrink tubing over the bottom part of
the bulb, including the other shrink tubing for mechanical strength.
How to use:
Find a convenient, out-of-the-way location
for the bulb (preferably out of the light). Connect the ground clip
to metal chassis. Feed the "antenna wire" through the firewall
and over the engine. Take pains tosecure it away from moving stuff, like
the fan. Wrap the "antenna" around one plug wire about 15 times,
and tie the end of the wire back over itself. DO NOT electrically
connect the "antenna" to the plug wire or to anything else. It picks up
the electrical pulses by induction (hence the term "antenna").
Anytime there is a spark pulse in the
wire, the neon bulb will flash -- dimly, but still flash. This does nothing
to the effectiveness of the ignition system, so can be left there for a
month or a year. When the engine's running, the bulb will flicker.
When you're cranking the engine on a cold, rainy morning, you can watch
to see if there's spark. If you have a similar test light attached to the
fuel pump, you can see if the pump's powered.
Ignition
Failure after Hot Soak: Won't Re-start. [Symptom:]My 1988 744 Turbo
with EZK 117 ignition starts and drives fine with A/C on in 95 degree Maryland
weather for about 30 minutes. It won't start once it is turned off. A strobe
test shows no spark. It sits for several hours (cools down presumably)
and then starts right off. In its disabled state there is system voltage
registers at both sides of the coil and at terminals (1) and (4) of the
Power Stage (booster). [Diagnosis:] First, check for a cracked and/or oil-contaminated
harness connector on the side of the distributor. If this is okay, then
replacement of the Hall Sensor in the distributor is the fix. Heat rises
in the stopped engine and increases temperature of the rear-top-mounted
distributor. A weak Hall breaks down and ceases to send pulses to ignition
control module; hence, no spark. Be careful not to bung-up the rivet holes
in the distributor body when you drill out the Hall attachments; you need
a good lip for the new sensor rivet ends to crush against. Mount two bolts
in a vice and use them as supports for the inner ends of the rivets as
you mash the outer ends with a drift.
[More on Hall Sensor:] Best idea when replacing
the Hall Sensor is to take the whole unit (just the bracket) to a dealer
and ask them to drill the old one and put the new one in. The rivets on
the Hall are harder than the aluminum bracket plate so if your drill slips
out you will have to buy a new distributor cause you can not buy just the
bracket. If you replace it yourself, you will need the help of a second
person to put the sensor back on. It has 2 rivets that need to be drilled
out. When you place the new one on you need a second person to hold it
squarely over a punch so you can peen the rivets in place. There are instructions
in the Volvo manuals. Be sure to note the way the collar with ears comes
off.
[Contrary Opinion on Hall Replacement:]
Although Volvo sells the Hall sensor separately from the distributor assembly,
a new distributor is usually more cost-effective for two reasons: First,
installing the mounting rivets in a new sensor is awkward, tedious work
. Because the sensor location prevents you from getting a straight shot
at the rivet heads, it's very difficult to drive the rivets in securely.
Second, bushing wear is common in higher-mileage Volvo distributors. You
can usually feel the wear-lateral movement in the distributor shaft-with
the distributor removed from the engine. A sloppy distributor shaft usually
goes hand-in-hand with distributor oil leaks, especially through the seal
protecting the inside of the distributor.
[More:] No spark on hot start. Engine decelerates
and stops when hot. Your problem is a classic symptom of a Hall Sensor
(inside distributor) going bad
[More:] Next time you have a hard ignition
failure pull a plug wire, insert an old spark plug, ground the outside
and check for spark. Now assuming that is it, go to the coil center high
tension lead and check for spark. Next ground the coil's high tension lead
and put a meter on the coil's 12v terminals. No 12v switching? Since most
systems apply 12v and switch the ground lead, if there is no 12v at all,
check the power lead to the ignition, wiring, fuse etc. If you do have
12v but no switching then check the reluctor in the distributor. Disconnect
the leads from the reluctor (in the distributor) from the ignition module
and measure with a sensitive DMM. You should see some small voltage as
you crank. At this point you've checked the power to the ignition module,
the reluctor, and the spark delivery path. That means the only thing left
to do is repair/replace the ignition module. More: My wife's '92 745T with
same engine (?) behaved in exactly the same way for a long time, maybe
a year or two, before we figured out that it was a bad sensor. (The sensor
screws into the top of the bell housing -- I can't recall the term for
it.) It was an intermittent fault, probably related to a break in the wire:
wiggling it as the engine ran stopped it cold, although it still cranked.
Wiggling it the other way allowed it to start.
Does
My Car Have a Hall or RPM Sensor? You can quit worrying about the Hall
sensor if you have a 89 or later non-turbo or 90 or later turbo. The Hall
sensor is gone in favor of the RPM sensor on top of bell housing. In these
cars, there is no plastic wiring connector on the side of the distributor
plate and no wires into the distributor other than the high-tension spark
leads to the cap.
Testing
Hall Sensor. Undo the distributor connector. When the ignition is ON
the Voltage between positive terminal (red lead -Nr. 3) and ground should
be approx. 11V - Voltage between (blue lead - Nr.2; middle one) and ground
should be 5V - Resistance between (black lead - Nr. 1) and ground should
be "0" Ohms Undo connector from the control unit (above the brake pedal)
and remove the sealing washers (plastic inserts on the side of the connector).
Replace connector without cover or sealing washers.
- Disconnect the/red and blue leads from
ignition coil. - Measure voltage between terminal 24 at rear of connector
(blue lead) and ground. NOTE: Connector must be attached to control unit.
- Switch on ignition. Turn crankshaft by hand. Voltage should indicate
OVER 1.8V each time a vane passes Hall generator. Instrument should read
approx."0" (0 - 0.7V) each time an opening passes Hall
generator. Correct voltage: Less then 0.7V
or more than 1.8V.
Replacing
RPM or Hall Sensors.
RPM Sensor: If your car is
a non-turbo 89+ model then it has a flywheel reading RPM/Position sensor
that is down below the rear of the cylinder head, mounted on the bellhousing
through a bracket retained by one bolt that should be a 10mm head on a
89. It is connected to wires above the engine on the firewall.
Hall Sensor: If it is 89
turbo or pre-89 then it has the Hall switch that is in distributor. The
Hall switch is tough as it requires that you knock out a pin and pull out
the shaft, then VERY carefully drill out a couple of pins that retain the
hall switch. Then you have to be very careful about supporting the distributor
base while bradding the retainer pins to retain the new hall switch. If
you slip while bradding the pins then you punch out a hole in the base
and then you need a new distributor. [Response 2:] Changing that
is not for the novice. It is riveted into the distributor. Some dealers
offer rebuilt exchange on the distributors. Before you jump to the hall
sensor, carefully examine the wires from the firewall to the distributor,
which sometimes break inside from years of flexing. These can be repaired
with a little work. Also, check the brittle plastic connector where the
wires go into the distributor. This can cause intermittent shorting. The
plastic fitting is Volvo PN 1346793, about $3.00 as I recall. If you are
going to remove the distributor for any reason, carefully scribe a mark
to return it to its exact former position so as not to change the timing
(the holes in the distributor are slotted). [Response 3:] I've done few
of these. Never alone, however. Drill out the old rivets carefully
and pry out the sensor. Next, have an assistant you can trust with
approximately $ 70.00 hold the new sensor in its proper place on the distributor
plate. Place a steel punch of roughly same diameter as the rivets
into the bench wise. Have the assistant hold the D. plate in such a way
that the rivet is directly over the punch. Now, YOU, using the second
punch and a hammer CAREFULLY hit the top part of the rivet. It will take
MANY hits since these darn rivets are made of steel. The key here is steady
hands, and frequent breaks. One wrong move, and you are done. Simple physics
tell you which, steel or aluminum will crack first under constant hammering.
This is akin to putting a horse shoe onto
an a hard boiled egg, possible but very nerve wracking.
Hall
Switch Distributor Connector. While replacing the distributor cap and
rotor on the 87 764T the Hall switch connector at the distributor cracked
off some of the old plastic and wouldn't stay on the distributor base.
Didn't crack any wires/insulation. This distributor is used at least through
90 (my 90 740T has the part) and so did an 86 B230FT engine I used the
long block on the 87. (Illustration courtesy of Mike Ponte)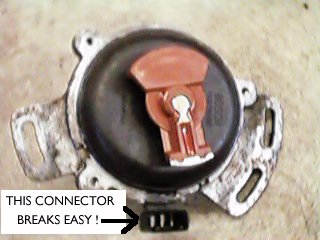
Anyway...the repair was quick and dirty...I
mixed up some loctite filled epoxy and glued in the connector. The stuff
sets up quickly and I baked it at warm (lowest possible setting) in the
kitchen oven for 5 minutes. Seems to be working since I put it together
and am driving the car. If it blows I still have the distributor from the
86 engine with the unbroken connector. [The plug is available at the dealer.
I got one a year ago. I think I paid $6.00.]
Distributor
R&R and Shaft Seal Replacement. [Editor's Note: See Michael Ponte's
excellent illustrations at http://www.mikeponte.com/volvo/dist.htm
These picture a pre-89 distributor with a Hall switch, but are similar
to newer ones as well.] Copies below:
[Query:] I have the beginnings of
an oil leak at the distributor o-rings (just beneath the shaft on the
B230F distributor.) According to Chilton's, it's easy to pull the cover,
cap and rotor, remove the shaft, and pull the distributor out to
replace both the big dust cover o-ring as well as the smaller o-ring inside
on the shaft. Has anyone actually done this? Is access a problem?
How about replacing the distributor: do you have to pay close attention
to shaft alignment?
[Another Related Query regarding Timing:]
My distributor appears to be seeping a small amount of oil on my 93 940
(sohc engine). I noticed this while doing the 90 kmiles service. I also
noticed the PO or his mechanic ditched the plastic dust shield. First thing
Monday, I'll get the dust cap as I'm thinking it will keep the rotor and
inside the cap clean. But I'm thinking maybe its time to replace those
nasty o-rings. Just one question, my book claims the timing is not adjustable.
I'm kind of wondering how do I set the timing, if I pull the distributor
and replace those o-rings? I can't find any info on this in my books.
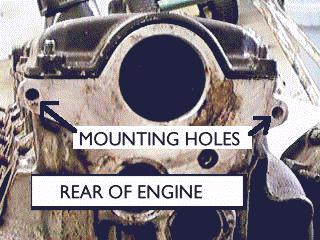
Removing the Distributor:
[Editor's Note:] The spark plug high-tension leads will probably
be tough to remove if you did not use dielectric grease on the boots last
time they were installed. Gently pry up the boots about one centimeter
with a blunt blade that won't scratch the cap, then pull them off while
holding the tops of the boots. [Response 1: Don Willson] Mark the
spark plug wires and the Hall connector down below (if used) and push the
connector "hair pin" in and pull down. Remove the three cap screws
with an 8 mm metric open end wrench. The screws in the cap are captive
and will not drop out. [Hall switch distributors: Mark the
position on the locking screws on the adjustment slot. Non-Hall distributors
have a self-aligning plastic device] Pull the cap straight back.
Remove the two 10mm distributor plate bolts. Pull distributor
straight out the back, noting the position of the plate, rotor and
offset eared drive cog. Draw a diagram so you can reinstall everything
correctly and not 180 degrees out of alignment.
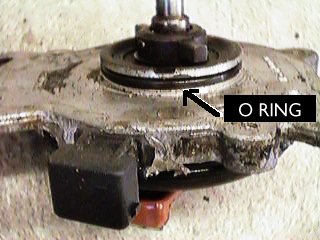
[O-Rings: Kevin Lawlor]
The small o-ring fits on the end of the shaft and the large o-ring fits
on the housing. Use a little Vaseline to install easily. [Tip from
JohnB] There are three O-rings, but the inside one is almost impossible
to replace, just forget it. The big O ring on the housing is generally
the leaker and the little ring on the shaft helps to keep oil out of the
distributor itself.
[Center Shaft Seal: Bruce]
There is a center shaft seal inside the distributor plate that dries out
and leaks oil. This shaft seal is not available to the public that I know
of. [Editor: try RPR] There
is a pin that needs to be driven out of the shaft that holds on the driver.
This pin is not easy to remove. [Another Note:] For those that
have oil leaking out of their distributor via the centre shaft, I have
just replaced the seal on the centre shaft that Volvo says you can't, using
the IPD tool and seal kit. [Editor: Tool not available.] Wasn't particularly
difficult, just followed the instructions in the kit and it all went smoothly,
all you need is a vice, hammer and a punch/drift. A whole lot cheaper than
a new dizzy from Volvo. [Removal Tip from Tom Irwin:] The solid
pin should be much easier. Generally, pressing the pin out with static
force works better than shock force. Use a vise with a counterbored block
of solid material in the rear jaw to support the shaft against compressive
force, then at the front jaw, use a hardened pin or drill bit as a drift
and squeeze it up gently. A large nut in the rear jaw should
be all the fixture you need, maybe Dremel it out to roughly match the contour
of the shaft. When the pin extends enough out of the shaft, grab
it up with a vise grip and yank it out.
Orientation: Mark all removed
pieces and their orientation. The cogged driver can be installed
180 degrees in reverse and the car will not start.
Older Distributors using Hall Sensors.
While the distributor is off check the 'housing' carefully...that's the
official Volvo part name for the little black connector that has three
blades in it that connects the Hall effect sensor to the wiring harness.
It's about $3.00 or so and breaks down in 10 years of oil and heat and
engine washes. It's
fairly difficult to reinstall...strong fingers and a pliers required. Needle
nose maybe to pull the blades entirely into the housing once the housing
is on the distributor body. But the housing replacement is thoroughly gratifying
if the connector was just hanging there. FWIW, I tried to repair/replace
the housing with epoxy and it just didn't hold. [Tip: JohnB]
The black plastic housing for the ignition trigger connector is replaceable...you
don't need to get a new distributor to replace it. Highly recommend you
replace it.
[Response: Bruce] Don't try doing the
Hall
sensor replacement yourself unless you get the IPD kit [Editor's Note:
it's not clear this is still sold]...drilling out the rivets is a hassle
too, the drill slips and reams the hole/s out and the new rivets won't
hold. If you can locate a Bosch aftermarket source or an independant Volvo
repair center try to get a complete new distributor, cap and rotor as one
unit. They are not cheap. The Hall switches are replacable. You have to
drill out the old rivets and pin in the new rivets. It is very easy to
crack the new hall switch or plate while pinning the new rivets in place.
The plastic connector needs replaced that the hall wires go into. Price
out the Hall switch, o-rings and cap and rotor. You may not be much less
that the price of a complete new unit. Shop around for a Bosch service
center or and independent Volvo repair center who may sell you the complete
Bosch unit cheaper that a Volvo brand unit.
Newer Distributors using RPM Sensors:
[Response:
Abe Crombie] The ignition system uses a crankshaft reading RPM sensor for
timing. The distributor has no bearing on timing. Take note of the position
of distributor by looking with a mirror at the relative length of distributor
adjustment slots where bolts go in. You may not need to do this as there
should be a plastic piece in one of the bolt holes that positions the distributor
housing. The distributor only goes into cam in one possible position due
to the offset slot that drives distributor via an offset eared piece. When
you pull distributor shaft out to replace the shaft seal take careful note
of position of the eared drive cog so it can be put back in the same place
and not 180 degrees off.
Re-installing the Distributor:
Put new O-rings on (big one on housing and little one on shaft lubed with
Vaseline) and use antiseize on the aluminum housing bolts. Use antiseize
paste on the aluminum body of the distributor, just a fine film will do...helps
to get it out next time.
[Editor's Note: the newer distributor
uses a plastic alignment fitting to ensure the distributor is re-installed
correctly. Don't move this fitting when you disassemble the distributor]
The rotor is installed in one direction only, matching the slot on the
shaft with the ridge inside the rotor.
Make sure you have a dustcap installed
under the rotor....it serves to keep crap from the hall sensor innards
as well as oil from the engine from getting to the inside of the distributor
cap. I found out a year after the dealer had re-O-ringed the distributor
and replaced the ignition wires (don't ask...I now do my own O-ringing
there) that the clown had left off the dust cap. It's a few bucks at the
dealer too...un-obtainable at auto stores. The dust cap is pre-installed
on Bosch caps.
Use silicone dielectric grease on the
spark high-tension lead boots to make both installation and removal easier.
Use your finger to align the metal lead in the boot into the cap, then
push down hard. It snaps home when correctly installed and you cannot
easily pull the lead back off. If it won't snap home, then make sure
you have not bent the metal connector.
Re-installing the Hall Sensor Distributor:
Check your timing when you put it back...I found
out mine was at 5 degrees BTC vice the 12 in the manual...makes a noticeable
difference in bottom end torque when you launch!!!
Engine
Hesitates When Humid. [Query:] During periods of great humidity
while driving at normal operating temperature, engine cuts out and then
after a second or 2 (sometimes more) it picks back up or stalls. If it
stalls sometimes it will start back up sometimes it won't; In this situation
(not starting back up) engine turns over but absolutely no ignition.
This model is a 760 with turbo and intercooler.
[Response:] The secondary ignition parts
are the first suspects for your trouble. The rotor can develop a hole from
spark hunting a place to go. The hole will be from center of rotor where
distributor cap contact touches through to underside where it sticks onto
shaft. This effectively shorts out spark. If, when you say "no ignition"
you mean no spark out of coil wire, then you needn't look at cap, rotor,
& wires. Then look for arcing coil top. The coil can develop an internal
short where the hole where coil wire inserts gets a crack that allows the
spark to jump to one of the other leads killing spark. OR your hall switch
is defective. If the hall switch or the hall switch (hall switch= sensor
assy. inside dist) connector is the problem then you will see tachometer
die INSTANTLY when problem occurs, i.e. tach drops to 0 before the engine
actually quits turning. Corrosion at the power stage connector (black and
gray unit wire connector behind and a few inches below headlight level
on driver's side inner fender behind air cleaner if it's a non-turbo) will
cause it to die with instant tach loss also.
760T
Engine Stops Dead at 60MPH; Bad Ignition Module. [Query: driving
down the highway at @ 60mph with 1/4 tank of gas in 100 degree temp in
well kept 84 760 Turbo; car just dies, engine turns over but will not start]
[Response:] Well, when my '84 760 Turbo died for no apparent reason
as you describe, it was in the freezing dark, going over Donner Pass.
Everything on the car worked except no spark and the engine wouldn't run.
It turned out to be the ignition module, which is mounted on the inner
driver's side fender well, above the battery, close to where someone else
mentioned the ballast resistor was located. It's easy to get to and
replace. If that turns out to be the culprit, shop around before
buying the new part. Volvo dealers charge several hundred $$$ for
this thing, but I found one from an independent parts distributor for about
$90 - the identical part made by BOSCH with the same part number
on it.
Intermittent
Ignition Failure: Power Stage [Query:] As you are all well aware,
intermittent problems are a b*tch to correct. However, last night,
the car started fine but stalled halfway out of the garage and would not
restart as has happened several times before. I've always suspected
an ignition fault rather than fuel as the engine dies instantly when it
happens. No sputtering, rough running or anything like that, it's
like the key was turned off.
First thing I did was hook up my timing
light and had one of the boys aim it at me while I cranked it over.
No indication of currant flow in the plug wire. Now I can dismiss
the fuel/fuel injection system (I think). Next I connect my Fluke
Meter to ground and the positive lead to the positive side of the coil
and switch on the ignition to the run position. No Voltage!
I ran back into the house to get a jumper lead - I was going to run it
directly from the battery to the coil but when I tested for voltage again
it was there. Get in the car and it started right up and died before
I could put it in gear. Open the hood and check for voltage at the
coil and it's gone. Now, w/o touching the key (I'd left it in the
run position), and without "tapping" anything with a hammer or "jiggling"
any wires, I test both sides of the coil for voltage again. I test
the positive side of the low tension ckt and it's 0 volts w/ respect to
ground, test the other low tension lead and it to is 0 volts w/ respect
to ground. Test the positive side once more and the voltage is back!
Get in, start the car and it runs fine. Anyone know what might be causing
this? [Response: Randy Holst] From a similar experience I had with
my (now departed) '84 760T, I would suggest that it is the ignition control
module, which is mounted on a heat sink on the inner driver's side fender
well next to the battery. At a very inopportune time and location,
mine quit working when I closed the hood while the engine was running.
The engine immediately quit as though someone had turned off the ignition.
The result was no spark, no juice to the coil and no amount of fiddling
around would change anything. (Long story about having the car towed,
isolating the problem and having a replacement part flown in omitted.)
Replacing the ignition control module cured the problem and it never reoccurred.
Engine
Suddenly Stops While Driving. [Query: Intermittent
engine failure, not temperature related.] [Response:] I'd certainly
look for a loose wire in the engine bay. A complete, sudden, intermittent
shutdown of the engine seems very much like an electrical problem - likely
a wire. If the revs drop to zero at once, i.e. even while the dead
engine is still turning over, that means that the ignition system has shut
down. This could be because it's power has been cut, or because the hall
effect sensor's wire is loose or something. It is less likely to
be in the HT side, because the rev counter is not affected by the
HT, only the LT.
Try wiring a small, say 5W, 12V bulb to
the coil "+" terminal, and start the car. The bulb should be on; If when
the car dies the bulb goes out, this means that the coil, and hence
the ignition system, has lost power. If you use a light bulb as opposed
to a voltmeter, you will be able to see if there are bad connections -
if the bulb flickers when you hit a road bump, for example, that's
a very good sign of a bad contact.
Failing that, wire the bulb to the fuel
pump. All these tests would tell you is if the power is being cut to either
the ignition or injection systems; it could still be that some other
wire is loose.
Engine
Cuts Out; Tach Drops. [Query:] I was on a long trip today, and
my normally fearless 760 ( 270K) actually shut down on me a couple of times.
Once I got it up to 70-75 mph, the engine cut out and the tach needle bottomed
out until I took my foot off the throttle and restarted the engine, at
which point it ran fine. It had an episode where it would get up to hwy
cruising speed, start to cut out, the tach needle shaking all over the
place, and then smoothing out once
I took my foot off the gas. Does this sound familiar to anyone? [Response:
Abe Crombie] Two things come to mind when you have an cut-out with an instant
tachometer drop chaser: 1. the rpm sensor behind and below cylinder head
that reads perforated surface on flywheel is going open 2. the ignition
power stage has a faulty connection or is faulty.
Failure
to Start; Flywheel Sensor Bad.
[Query:]My 1990 740GL has been having trouble starting for the last few
months. I replaced the cap, rotor, plugs and fuel pump relay. The wiring
harness looks fine. Today it refused to start at all. Cranks fine, but
no spark. I unplugged and re-plugged the flywheel position sensor at the
firewall and it started! The contacts looked OK, but I cleaned them and
put on some dielectric grease. Now we'll see if that did it. Question:
I remember some talk on the list awhile back about a recall or TSB on faulty
flywheel position sensors (impulse sensor) on late '80s 740s. I can't find
the message on my hard drive. I seem to recall that the model with a yellow
band was either the good one or the bad one. Mine is yellow. [Response:]
The newer kind has a white band, as opposed to the older style yellow band.
Replacement takes about 10 minutes.
Car
Won't Start; Ignition Diagnosis. [Problem:] This morning my 86
740 GLE (B230F) started and ran for approx. 30 seconds then died and will
not restart. No spark exists at the coil (replaced coil with new one no
change). The fuel relay does kick on after taking the ignition switch from
start to run. [Response:] Ok let's go thru a general no start
fault trace:
1. When you turn the key on does the pump
run for about 1 second? From your post I would assume that the answer is
yes. This indicates that the fuel pump runs and the relay and ECM are capable
of turning it on.
2. When you put the engine to crank does
the pump run during the cranking? Again you said yes, as you deduced
this indicates that the hall switch is working
3. is there spark at the coil itself?
(to test pull the coil wire part way out and have someone else crank the
engine) If the answer is yes then the problem is in the distributor secondary
(cap, rotor, wires) If the answer is no continue.
4. Is there voltage present at the coil
low tension terminals with the key on? ( and are all the wires connected?)
If no fix, if yes continue
5. Is the power stage connected? yes?
remove the connector and examine the terminals on both the power stage
and connector if they are corroded they will need to be cleaned. Still
no start continue.
6. IS THERE ANY GAS IN THE TANK?
Car
Starts but All Electricals Are Dead: Ignition Switch. [Query:]
I can start my car but all the auxiliary electricals are dead. [Response:
Bruce] The ignition switch has a dead spot. Replace the electrical
part of the ignition switch. This is common for all 240's and 700's with
the ignition key located in the dash. Move the key toward start a little,
from the run position, and you will find the dead spot.
Ignition
Switch Replacement in 740/940. [Procedure from Mark O'Connell]
I have replaced my lock on my 1989 765t. Do this before the lock will no
longer turn!!!!.....If it's like my 89 (with the ignition lock on the column)
Then you have to turn the lock to the run position (position #2) and there
is a small hole on the top of the cylinder housing (assuming you have removed
the plastic shrouding, and unplugged the connector on the back side of
the cylinder housing) insert a small drill bit into this hole and depress,
this will release the lock cylinder, and it should pull right out. If you
wait until the cylinder won't turn, you have to remove the cylinder by
drilling and grinding..
[Response from Bob] You don't have
to remove the steering wheel under normal circumstances. The method for
removing the lock cylinder is to remove top and bottom steering column
covers, insert key, turn to position 1, press small button on top of column
lock assembly (about 1" from end of lock cylinder) and pull out lock cylinder.
If you have drilled out the lock, this method may or may not work. Try
turning to position 1 with your screwdriver, press the button and see if
it will come out. The button is brass colored, about 1/8 inch in diameter.
It doesn't move very far. All it does is release the spring clip that holds
the cylinder in. If you can't get it out, you may have to pull the column
out and press off the whole lock assy.
Ignition
Switch Replacement in 960. [Tip from Tom Irwin] I've had a few
requests to explain the few easy steps to switch out a bad ignition switch
on a 95 964, and presumably other models as well. The symptoms
that led me to diagnose a bad ign. sw. were:
1. On hot days when you start the car and
the key position returns from 3 to 2, most of the electrical will not work.
Turn signals, headlights, power windows, the 'Ding-Dong' seat belt reminder
etc. Wiggling the key a bit would cause everything to come back on.
2. Occasionally, while driving, if your
right knee should brush against the key chain, the engine will shut off.
It's a little disquieting to have that happen whilst supercruising at 90+mph,
#1 lane, on the interstate.
Time to fix...
That part is CHEAP(!) by Volvo standards.
Full Dealer Chump Price is only $37 bucks. Clayton, et al. will sell
it for $26...
-
Disconnect Battery Ground cable.
-
Wait minimum of 10 minutes for SRS system
to de-energize its back up power supply. Volvo book says to pull some other
panels and disconnect the SRS trigger wire. I never saw the need to do
that so long as you respect that 10-minute wait.
-
Remove the lower knee bolster cover, two screws,
T-25 I believe, working from the transmission hump, up and over, unsnap
1, unsnap 2, unclip 3 over below the headlight switch. Slide the large
plastic cover out towards you. Pay attention how it slides into the two
receiver slots, it's easy to screw up on reassembly. Don't forget to unclip
the electrical connector from the foot well light on that bolster cover.
-
Look up underneath the shroud that surrounds
your steering column, ignition key assembly. There are 6 screws. 4 of them
hold the 2 plastic halves together. Remove them now. The last 2 secure
the bottom plastic half to the steering column itself. Remove them too.
-
Remove the lower plastic half, set aside.
-
Lower the 'Tilt-Wheel' mechanism as low as
it will go.
-
Remove the upper plastic half, set aside.
-
Put the key in, turn to #2 position.
-
Looking at the left side of steering column,
see the bundled wire harness attached to the ignition switch? Good.
Slip a thin, flat bladed screwdriver between the harness connector and
the switch body. Gently work your way around until it comes off of the
switch body, then pull it aside.
-
Remove 2 slotted screws that hold the switch
assembly on to the steering column.
-
Remove switch assembly and replace with new
one.
-
Installation is the reverse of removal.
Volvo Maintenance
FAQ for 7xx/9xx/90 Cars
Top of Page